- Disconnect your old modem and router from power including any other wireless equipment connected to your modem.
- Connect your Gateway eero to your modem using the Ethernet cable provided in the box. Use any Ethernet port on the back of your eero.
- Plug your Gateway eero into power outlet and reconnect your modem to power. The eero device’s status light will start flashing white.
- Tap “Next” in the eero app to search for your new eero. The Gateway eero’s LED will flash and then turn solid once detected.
- Once your eero is found, choose a location and enter your eero’s serial number (found under the device) .
- Select a network name (SSID) and password for your network, which devices will use to connect.Tip: To avoid issues, consider reusing current SSID and password.
- Position centrally to cover dead spots.
- Keep it visible; ideally in open spaces, not inside media consoles or cabinets.
- Avoid placement near large electronics, as metal can block WiFi signals.
- Follow the setup instructions in the eero app.
- When prompted to connect your gateway eero to your modem, use an Ethernet cable to connect your gateway eero directly to your modem/router combo device.
- When creating a network name (SSID), choose a unique name for your eero network.
- [Optional] After setting up your eeros, for optimal network performance, consider disabling the routing and WiFi functions of your combo device by enabling bridge mode
-
Bridge your eeros:
- By allowing your current router manage the internet connection and continue to benefit from mesh technology
- Simply set up your eero network through the eero app
- Go to Settings > Network settings in the app, choose DHCP & NAT, and switch from Automatic to Bridge mode.
-
Or Double NAT-ing Your eeros:
- If you have a separate router and modem, connect your gateway eero to your existing router instead of directly to the modem.
- Follow the setup instructions in the eero app after connecting
- For those using a modem/router combo, connect your gateway eero to it and proceed with setup.
- To streamline your setup, consider setting your modem/router combo to bridge mode.
- Remember to use a different network name (SSID) and password for your eero network to avoid any issues with overlapping networks.
- Proximity: During setup, keep your eeros within 50 feet of each other. Once your network is running, you can spread them out.
- Wired Connections: If your home has Ethernet wiring, consider hardwiring your eeros for faster and more reliable connections.
- Gateway eero Placement: Place your gateway eero in a central location rather than in a basement to improve network speed.
- Inter-eero Communication: Position eeros where they can communicate, ideally halfway between the gateway eero and any dead zones.
- Surface: Place eeros on stable, flat surfaces like tables or countertops.
- Height: Position eeros halfway between the floor and ceiling for optimal signal radiation.
- Openness: Keep eeros out in the open, avoiding enclosed spaces like media consoles or cabinets.
- Barrier Minimization: Place eeros near thinner barriers and avoid dense materials like plaster or metal for better performance. Aim for a direct line of sight between eeros.
- Heavy Metal Objects: Avoid placing eeros near heavy metal objects like refrigerators.
- Interference Sources: Keep eeros 20-30 feet away from interference-causing objects like microwaves, cordless phones, WiMAX, other WiFi networks, power lines, DSS radio leakage, old satellite dish cables, fluorescent lights, and radar.
- Smothering: Ensure eeros are not covered or enclosed in small spaces.
- Soft Surfaces: Avoid placing eeros on unstable or soft surfaces like chairs or cushions.
- Open the eero app.
- Tap the Settings icon at the bottom right.
- Select “Guest Access” from the menu.
- Toggle “Enable” to On.
- Share the network name and password with your guests.
- Or use the app to send credentials via SMS or email with “Share guest network.”
- Guests can also join instantly by scanning your unique QR code.
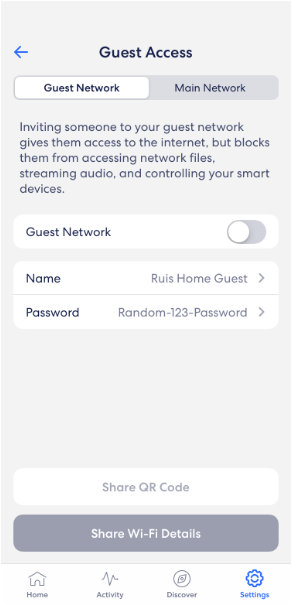
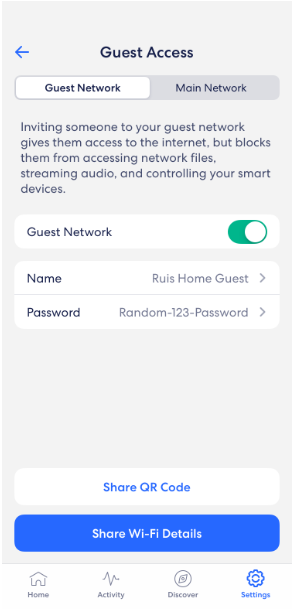 Image source: https://support.eero.com/hc/en-us/articles/207895123-How-do-I-share-my-eero-network-with-guests
Quick Tip for Android Users: You can set one
of these sharing options as your default for future
sharing of guest network credentials on your Android
device. To change or remove this default setting, go
to your Android app management menu, select the
respective app, and choose “Remove
Defaults” from the sub-menu. To disable the
guest network, simply follow the same steps as above
and toggle “Enable” to Off. This will
disconnect any previously connected devices from your
home network.
Image source: https://support.eero.com/hc/en-us/articles/207895123-How-do-I-share-my-eero-network-with-guests
Quick Tip for Android Users: You can set one
of these sharing options as your default for future
sharing of guest network credentials on your Android
device. To change or remove this default setting, go
to your Android app management menu, select the
respective app, and choose “Remove
Defaults” from the sub-menu. To disable the
guest network, simply follow the same steps as above
and toggle “Enable” to Off. This will
disconnect any previously connected devices from your
home network.
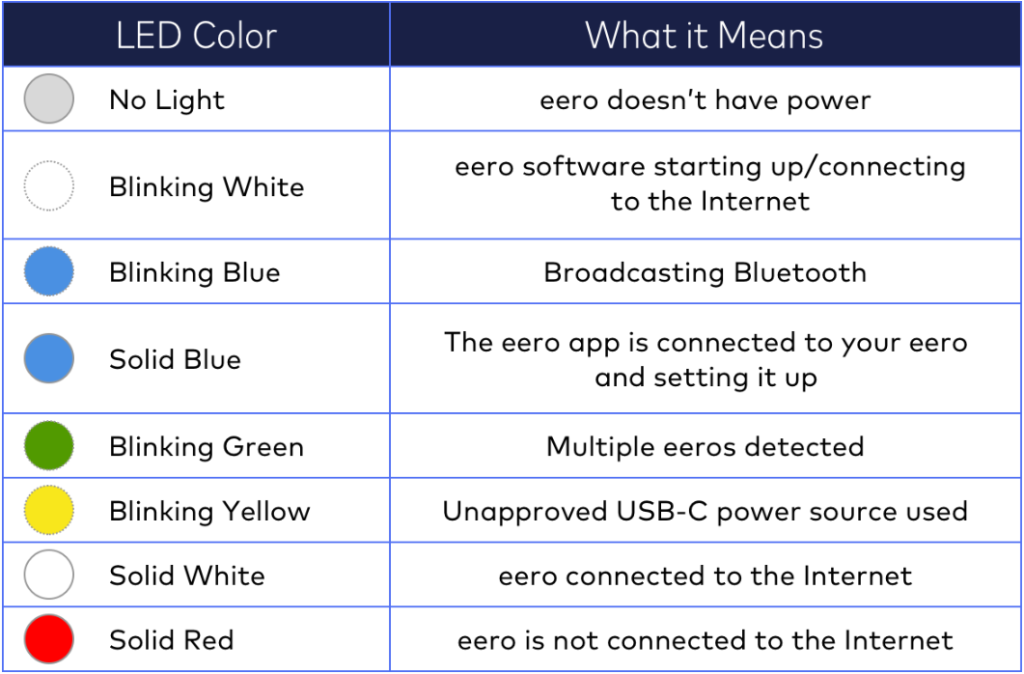 Image source :
https://support.eero.com/hc/en-us/articles/207908663-What-do-the-colors-of-the-LED-light-on-my-eero-mean
Image source :
https://support.eero.com/hc/en-us/articles/207908663-What-do-the-colors-of-the-LED-light-on-my-eero-mean
A: WiFi 7 is the latest WiFi standard, known as IEEE 802.11be Extremely High Throughput (EHT). It works across all three bands (2.4 GHz, 5 GHz, and 6 GHz) to fully utilize spectrum resources. Compared to previous standards like WiFi 6 and WiFi 6E, WiFi 7 offers higher capacity, speed, stability, and reduced latency. This means you can expect up to 80% higher speeds with fewer instances of buffering, lag, and congestion. If you're dealing with constant buffering or lag, a WiFi 7 router could be your best solution for a smoother, faster internet experience.
A: In today's digital age, with an increasing number of devices and activities relying on home internet, ensuring reliable and fast connectivity is paramount. WiFi 7 is crucial for maintaining high standards of internet performance. Whether you're streaming videos, conducting video calls, gaming, or managing smart devices, WiFi 7 offers the capacity and efficiency to support modern digital lifestyles without compromising on speed or stability. It's particularly beneficial for households with multiple users and devices, ensuring uninterrupted internet for productivity, entertainment, and smart home functionality.
A: We're excited to be the first to bring Amazon eero's most advanced WiFi system ever – the eero Max 7 – to Singapore! Sign up for any of our 3Gbps, 5Gbps, or 10Gbps plans and bundle it with the eero Max 7 for maximum coverage and performance. Explore our eero Max 7 bundles here
A: The eero Max 7 isn't just another router—it's your gateway to a future-ready home internet experience. Designed to anticipate and meet the demands of modern connectivity, it boasts two 10 gigabit Ethernet ports that maximize speeds up to 10 Gbps. Powered by eero's patented TrueMesh and Wi-Fi 7 technologies, it delivers twice the speed of previous generations, ensuring your home network is not only fast but also incredibly stable. This means smoother streaming, lag-free gaming, and seamless smart home integration, all with unparalleled speed and performance. Explore our eero Max 7 bundles here
A: To set up your eero device, check out the steps below: Step 1: Download the eero App: Get the eero app from iOS or Android store. Please note: You cannot set up your system using a web browser. Step 2: Create or log into your account: Enter your phone number and email address for account creation. A verification code will be sent to your phone number by default to complete account set up. Step 3: Set Up Your eero Gateway with the following steps:
- Disconnect your old modem and router from power including any other wireless equipment connected to your modem.
- Connect your Gateway eero to your modem using the Ethernet cable provided in the box. Use any Ethernet port on the back of your eero.
- Plug your Gateway eero into power outlet and reconnect your modem to power. The eero device’s status light will start flashing white.
- Tap “Next” in the eero app to search for your new eero. The Gateway eero’s LED will flash and then turn solid once detected.
- Once your eero is found, choose a location and enter your eero’s serial number (found under the device) .
- Select a network name (SSID) and password for your network, which devices will use to connect.Tip: To avoid issues, consider reusing current SSID and password.
- Position centrally to cover dead spots.
- Keep it visible; ideally in open spaces, not inside media consoles or cabinets.
- Avoid placement near large electronics, as metal can block WiFi signals.
A: We've tested eero for compatibility with the majority of modems we are offering today. Unless specified otherwise, eero should seamlessly integrate with your current modem upon setup. Follow these steps to set up your eero with your modem:
- Follow the setup instructions in the eero app.
- When prompted to connect your gateway eero to your modem, use an Ethernet cable to connect your gateway eero directly to your modem/router combo device.
- When creating a network name (SSID), choose a unique name for your eero network.
- [Optional] After setting up your eeros, for optimal network performance, consider disabling the routing and WiFi functions of your combo device by enabling bridge mode
A: To optimize your eero WiFi system, we recommend connecting your gateway eero directly to your modem to replace your current router. However, if you prefer to continue using your existing router, that’s completely fine too. You may either:
-
Bridge your eeros:
- By allowing your current router manage the internet connection and continue to benefit from mesh technology
- Simply set up your eero network through the eero app
- Go to Settings > Network settings in the app, choose DHCP & NAT, and switch from Automatic to Bridge mode.
-
Or Double NAT-ing Your eeros:
- If you have a separate router and modem, connect your gateway eero to your existing router instead of directly to the modem.
- Follow the setup instructions in the eero app after connecting
- For those using a modem/router combo, connect your gateway eero to it and proceed with setup.
- To streamline your setup, consider setting your modem/router combo to bridge mode.
- Remember to use a different network name (SSID) and password for your eero network to avoid any issues with overlapping networks.
A: Setup Tips for Your eero Network: Optimal Placement:
- Proximity: During setup, keep your eeros within 50 feet of each other. Once your network is running, you can spread them out.
- Wired Connections: If your home has Ethernet wiring, consider hardwiring your eeros for faster and more reliable connections.
- Gateway eero Placement: Place your gateway eero in a central location rather than in a basement to improve network speed.
- Inter-eero Communication: Position eeros where they can communicate, ideally halfway between the gateway eero and any dead zones.
- Surface: Place eeros on stable, flat surfaces like tables or countertops.
- Height: Position eeros halfway between the floor and ceiling for optimal signal radiation.
- Openness: Keep eeros out in the open, avoiding enclosed spaces like media consoles or cabinets.
- Barrier Minimization: Place eeros near thinner barriers and avoid dense materials like plaster or metal for better performance. Aim for a direct line of sight between eeros.
- Heavy Metal Objects: Avoid placing eeros near heavy metal objects like refrigerators.
- Interference Sources: Keep eeros 20-30 feet away from interference-causing objects like microwaves, cordless phones, WiMAX, other WiFi networks, power lines, DSS radio leakage, old satellite dish cables, fluorescent lights, and radar.
- Smothering: Ensure eeros are not covered or enclosed in small spaces.
- Soft Surfaces: Avoid placing eeros on unstable or soft surfaces like chairs or cushions.
A: With eero, you can create a separate guest network alongside your main WiFi for visitors. Here’s how to set it up:
- Open the eero app.
- Tap the Settings icon at the bottom right.
- Select "Guest Access" from the menu.
- Toggle "Enable" to On.
- Share the network name and password with your guests.
- Or use the app to send credentials via SMS or email with "Share guest network."
- Guests can also join instantly by scanning your unique QR code.

 Image source: https://support.eero.com/hc/en-us/articles/207895123-How-do-I-share-my-eero-network-with-guests
Quick Tip for Android Users: You can
set one of these sharing options as your default
for future sharing of guest network credentials
on your Android device. To change or remove this
default setting, go to your Android app
management menu, select the respective app, and
choose "Remove Defaults" from the sub-menu. To
disable the guest network, simply follow the
same steps as above and toggle "Enable" to Off.
This will disconnect any previously connected
devices from your home network.
Image source: https://support.eero.com/hc/en-us/articles/207895123-How-do-I-share-my-eero-network-with-guests
Quick Tip for Android Users: You can
set one of these sharing options as your default
for future sharing of guest network credentials
on your Android device. To change or remove this
default setting, go to your Android app
management menu, select the respective app, and
choose "Remove Defaults" from the sub-menu. To
disable the guest network, simply follow the
same steps as above and toggle "Enable" to Off.
This will disconnect any previously connected
devices from your home network.
A: Your eero features an LED
status light on the front. Normally, it will
display a solid white light (unless turned
off) when operating correctly. If the LED
displays a different color, blinks, or
flashes, please refer to the following list:
 Image source :
https://support.eero.com/hc/en-us/articles/207908663-What-do-the-colors-of-the-LED-light-on-my-eero-mean
Image source :
https://support.eero.com/hc/en-us/articles/207908663-What-do-the-colors-of-the-LED-light-on-my-eero-mean
A: Yes, you can mix different eero models in your network. All eeros are compatible with each other, regardless of their model or release date. However, it's important to start your network with an eero model that has an ethernet port (such as eero 6, or eero 6 Pro) to connect directly to your modem. Once this gateway eero is set up, you can add any combination of eeros, including models like eero Max 7 and eero Pro 6E, to expand your network coverage and utilize their specific features. If you have questions about setting up or expanding your eero network with different models, feel free to contact our technical support team at (+65) 3102 0000 or [email protected]. We're here to assist you!
A: All eeros purchased from ViewQwest will come with 2-year limited warranty.
A: If you encounter any problem with the eero within the warranty period, please contact ViewQwest technical support at (+65) 3102 0000 or [email protected].